Annie Sloan updated settee

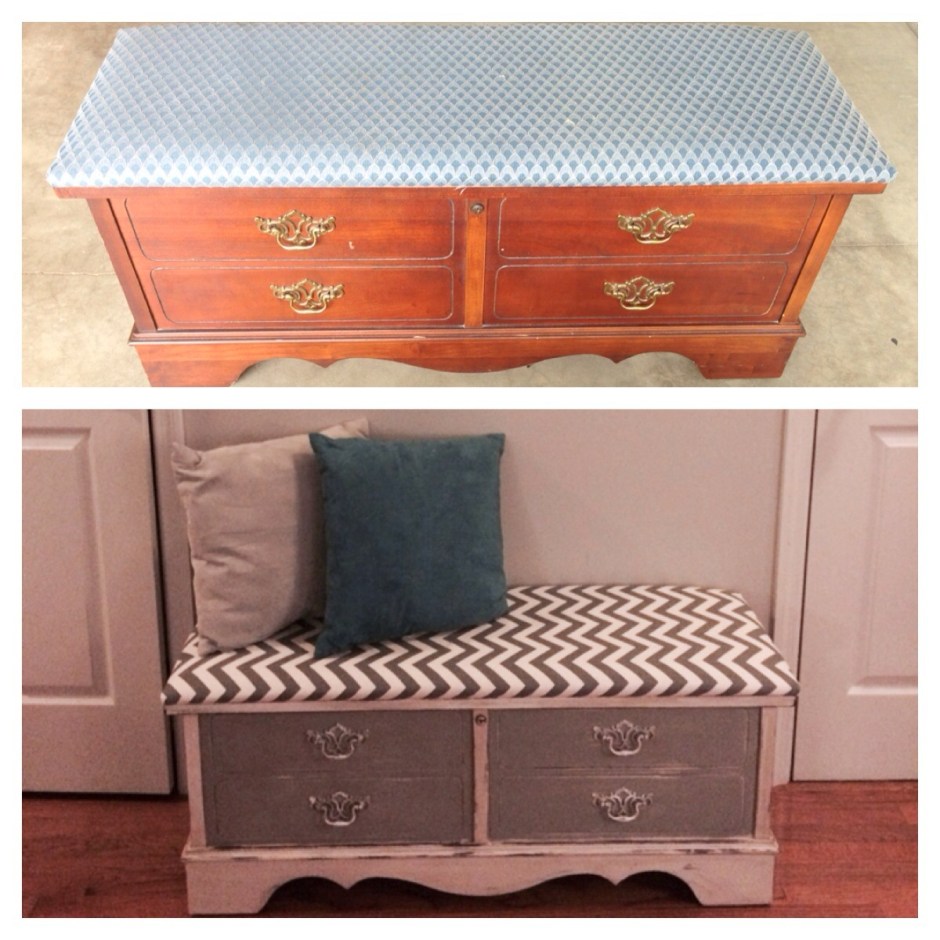
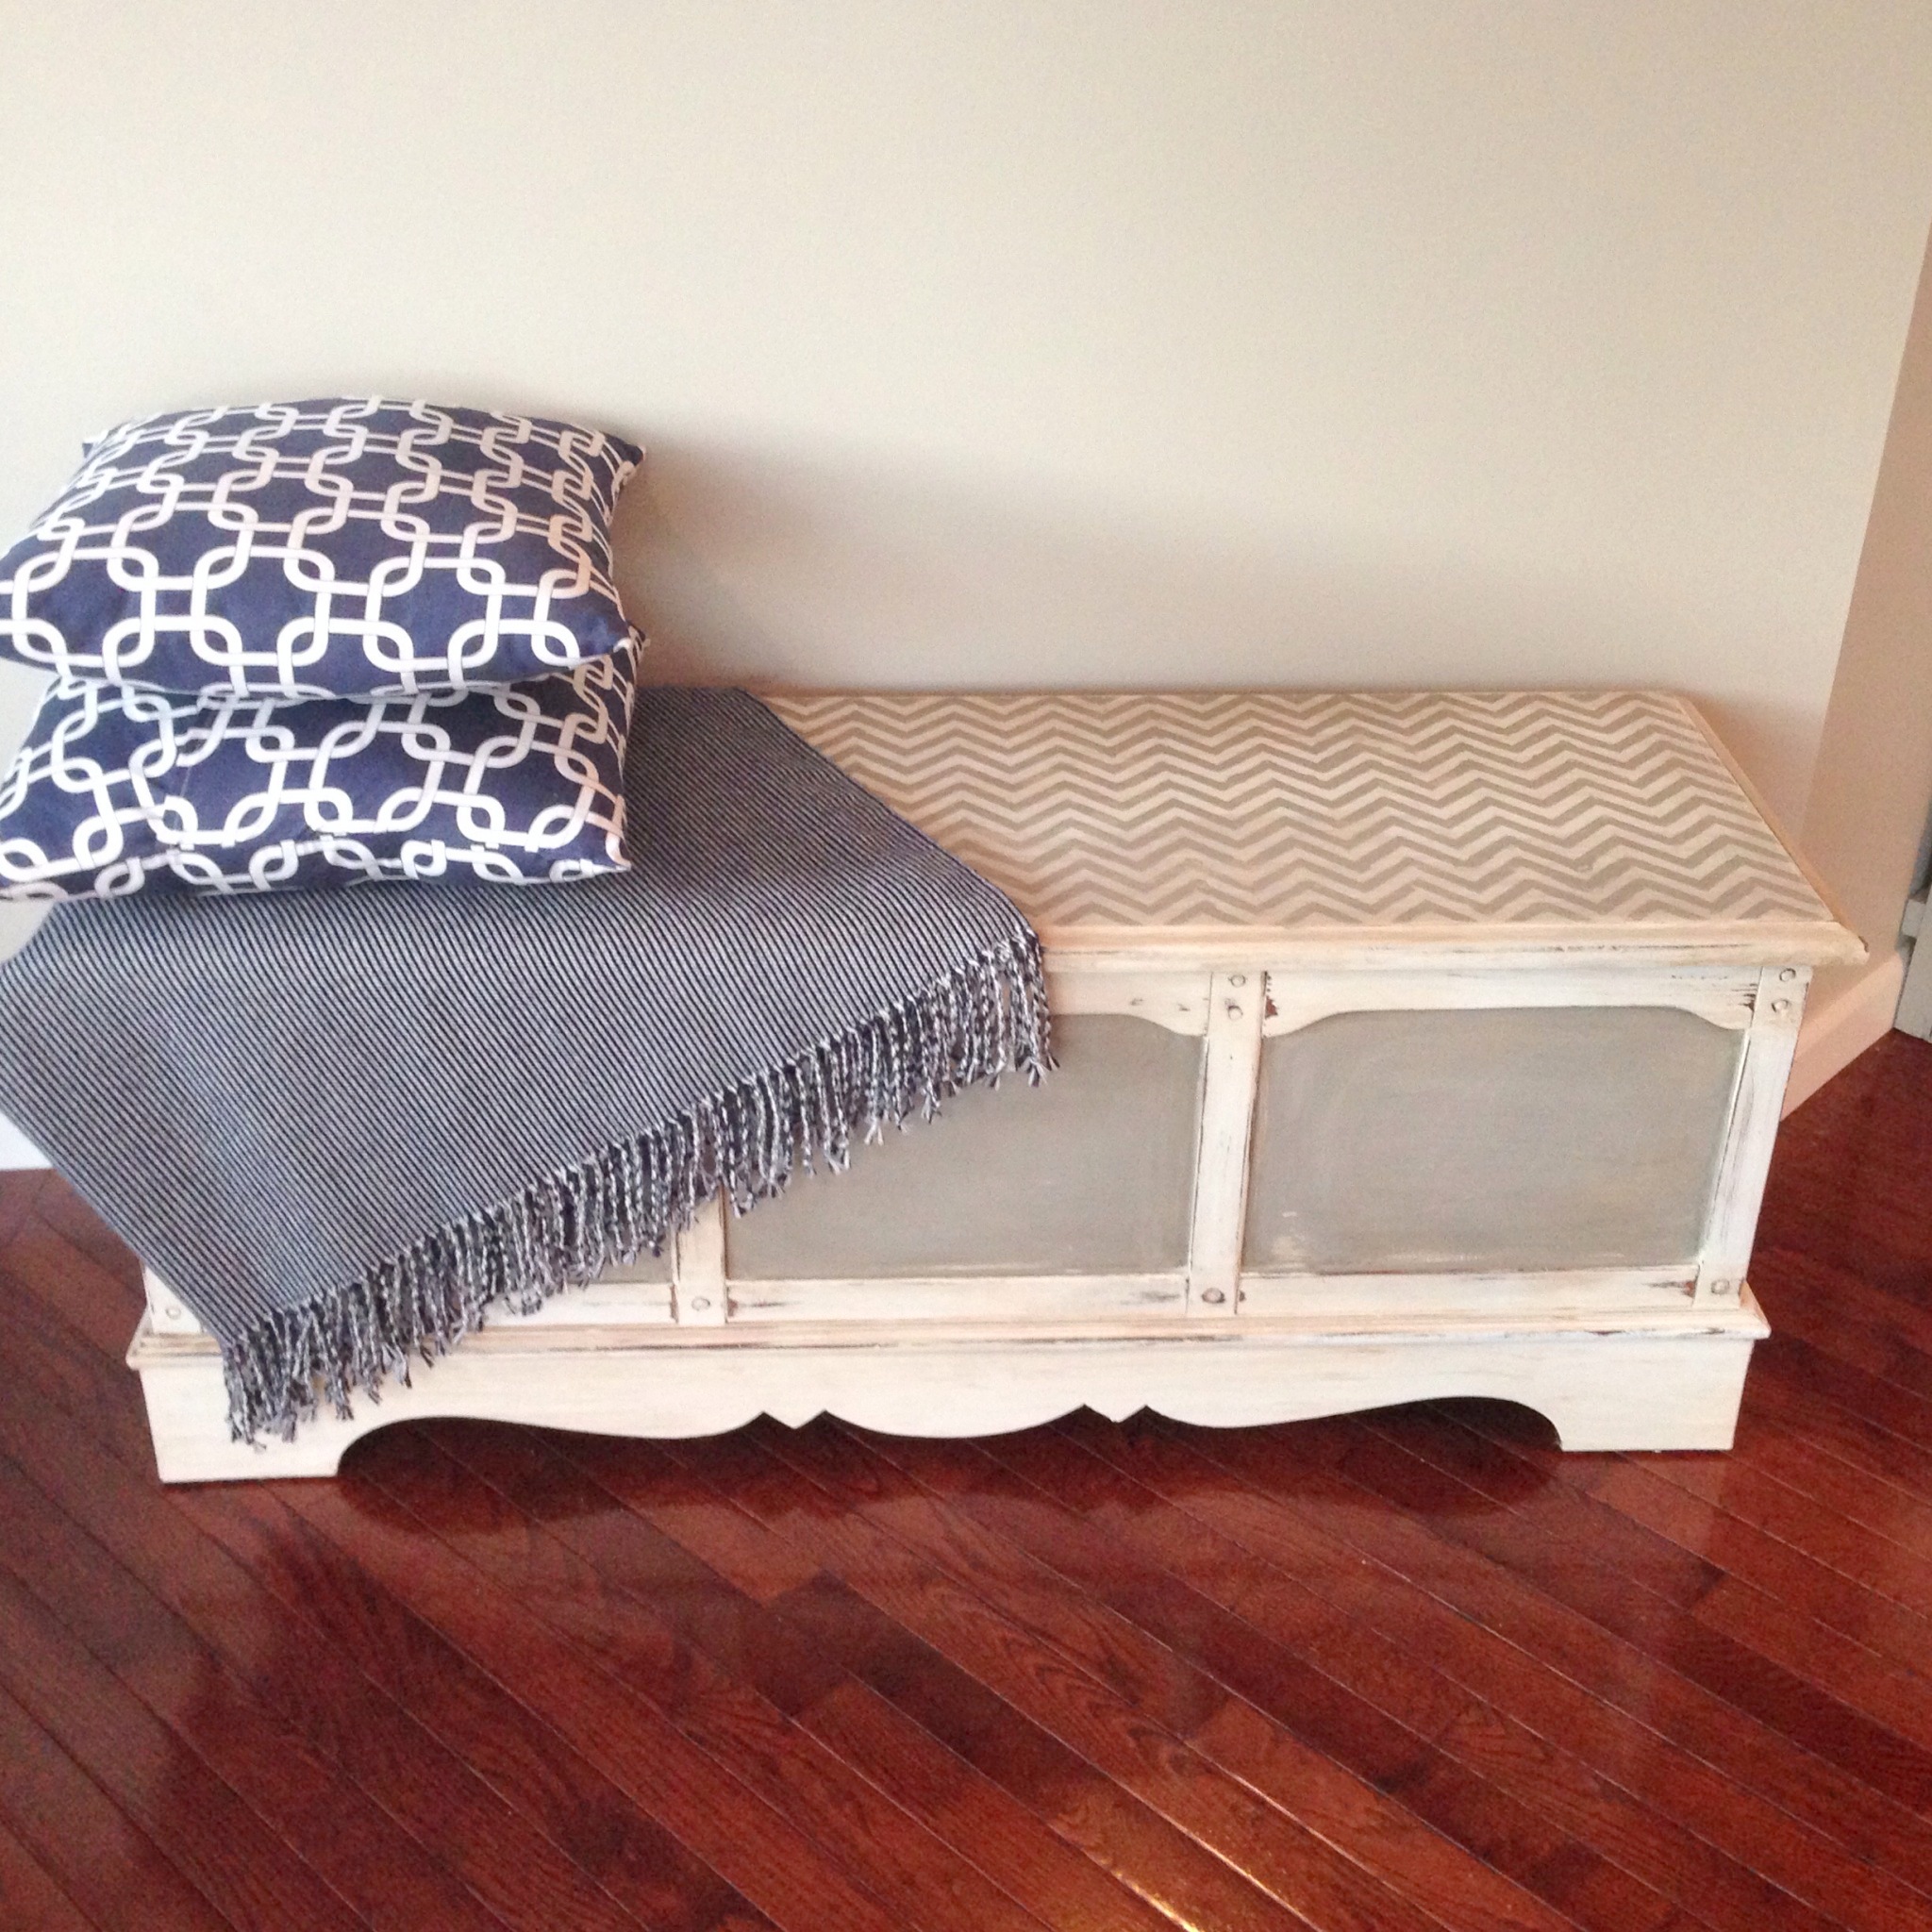
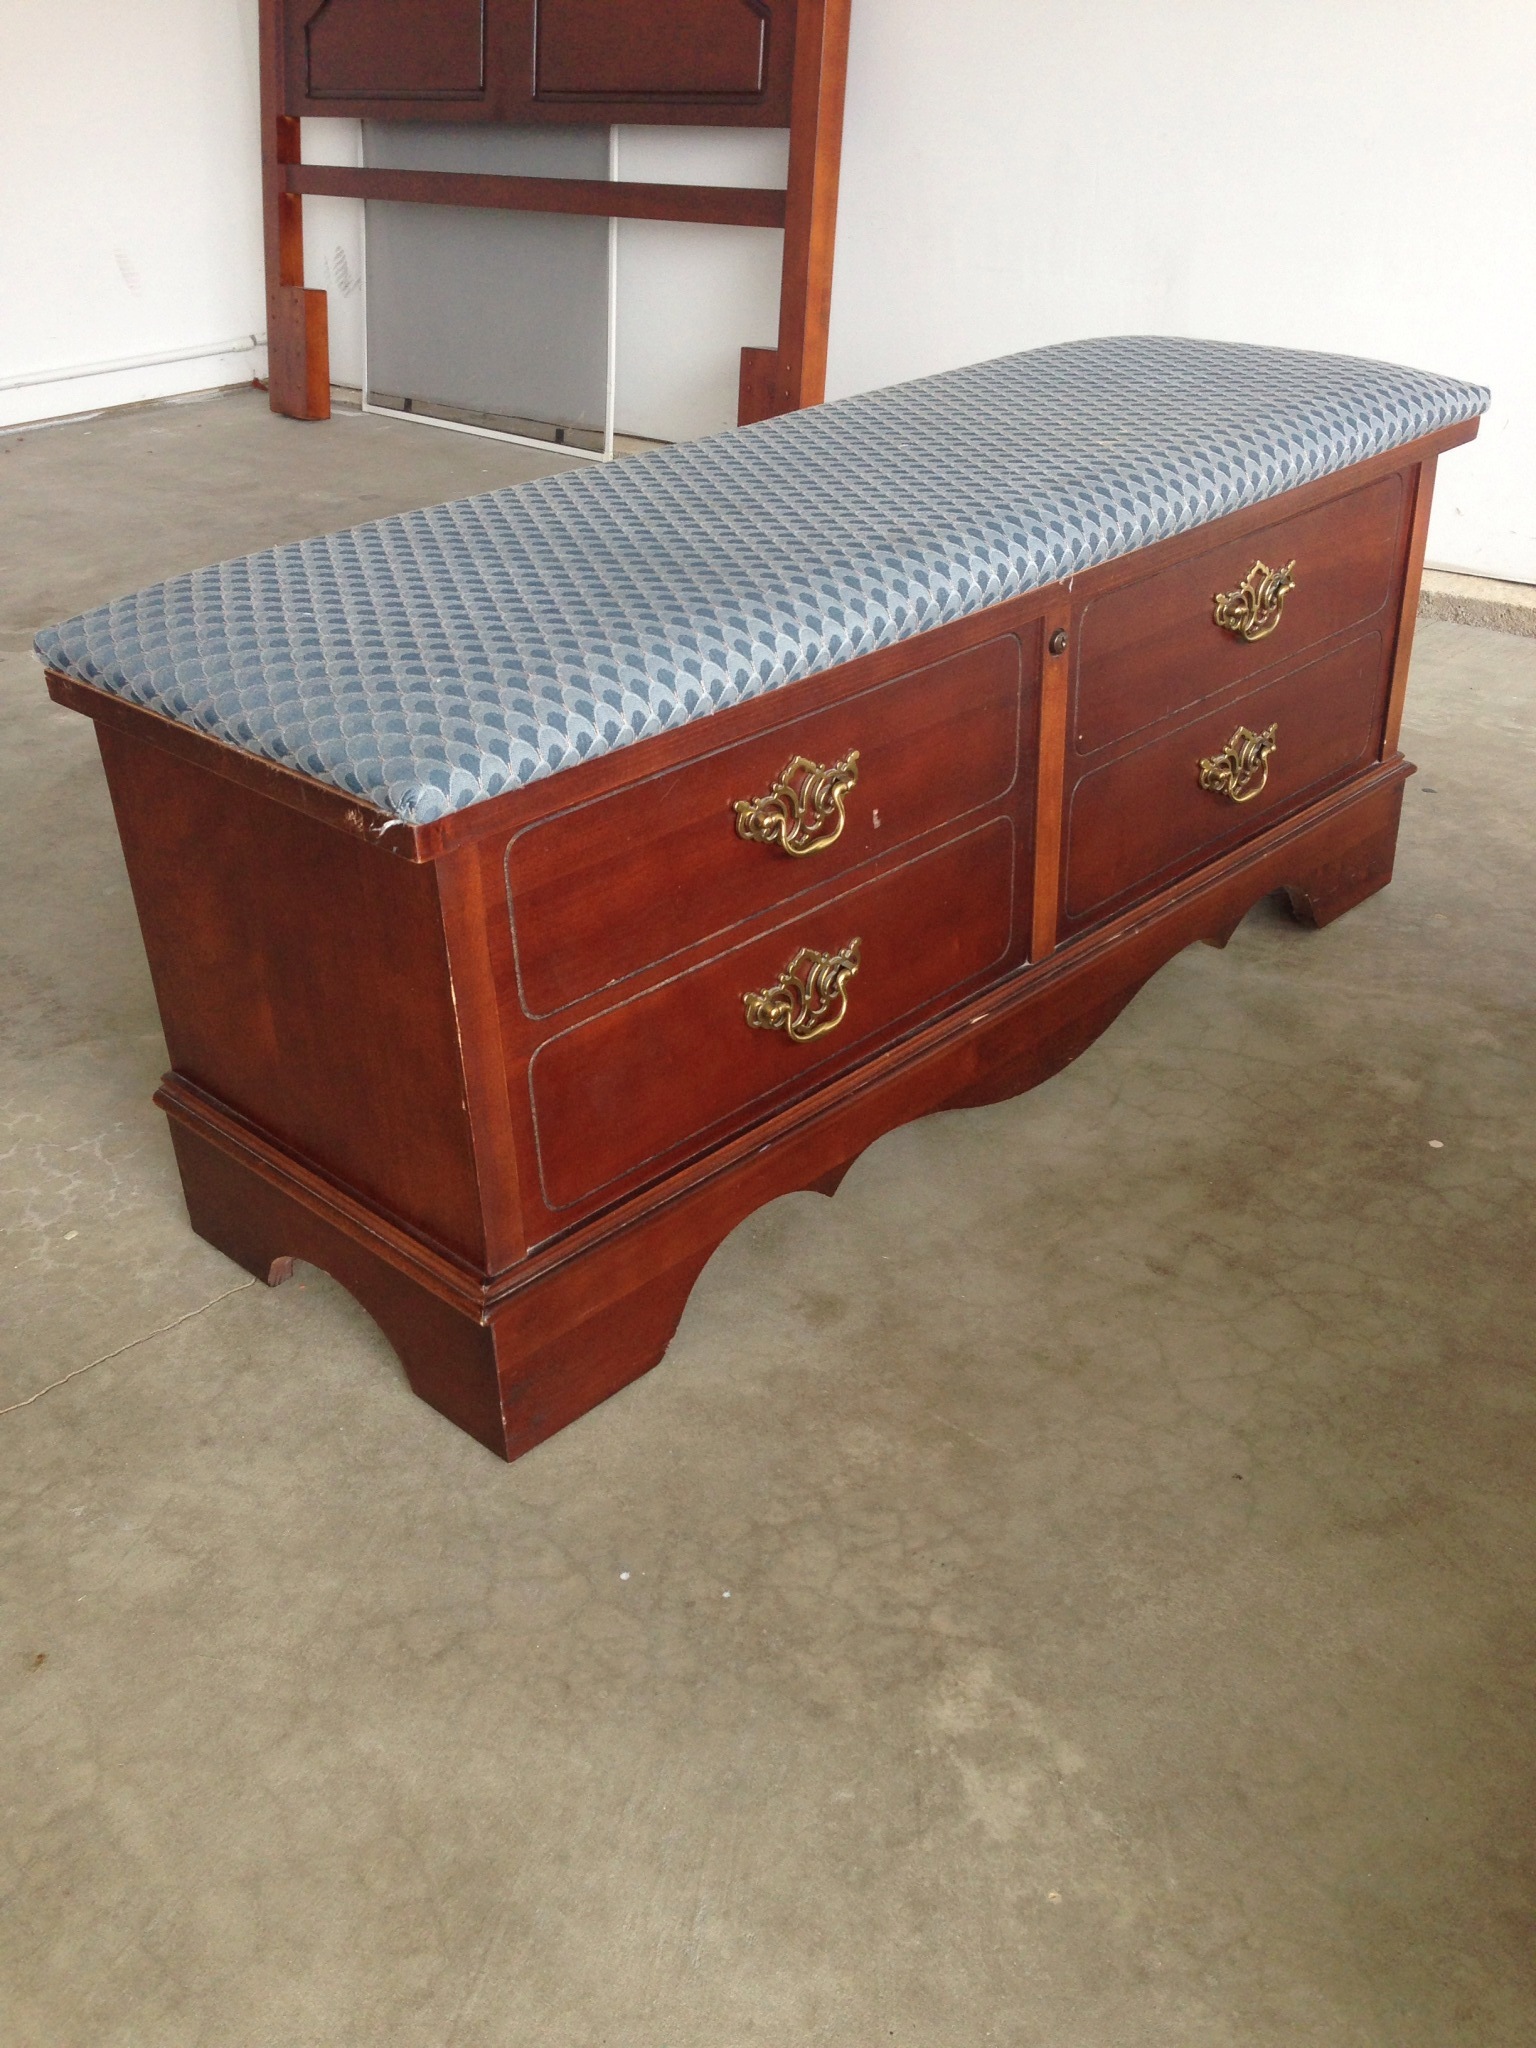
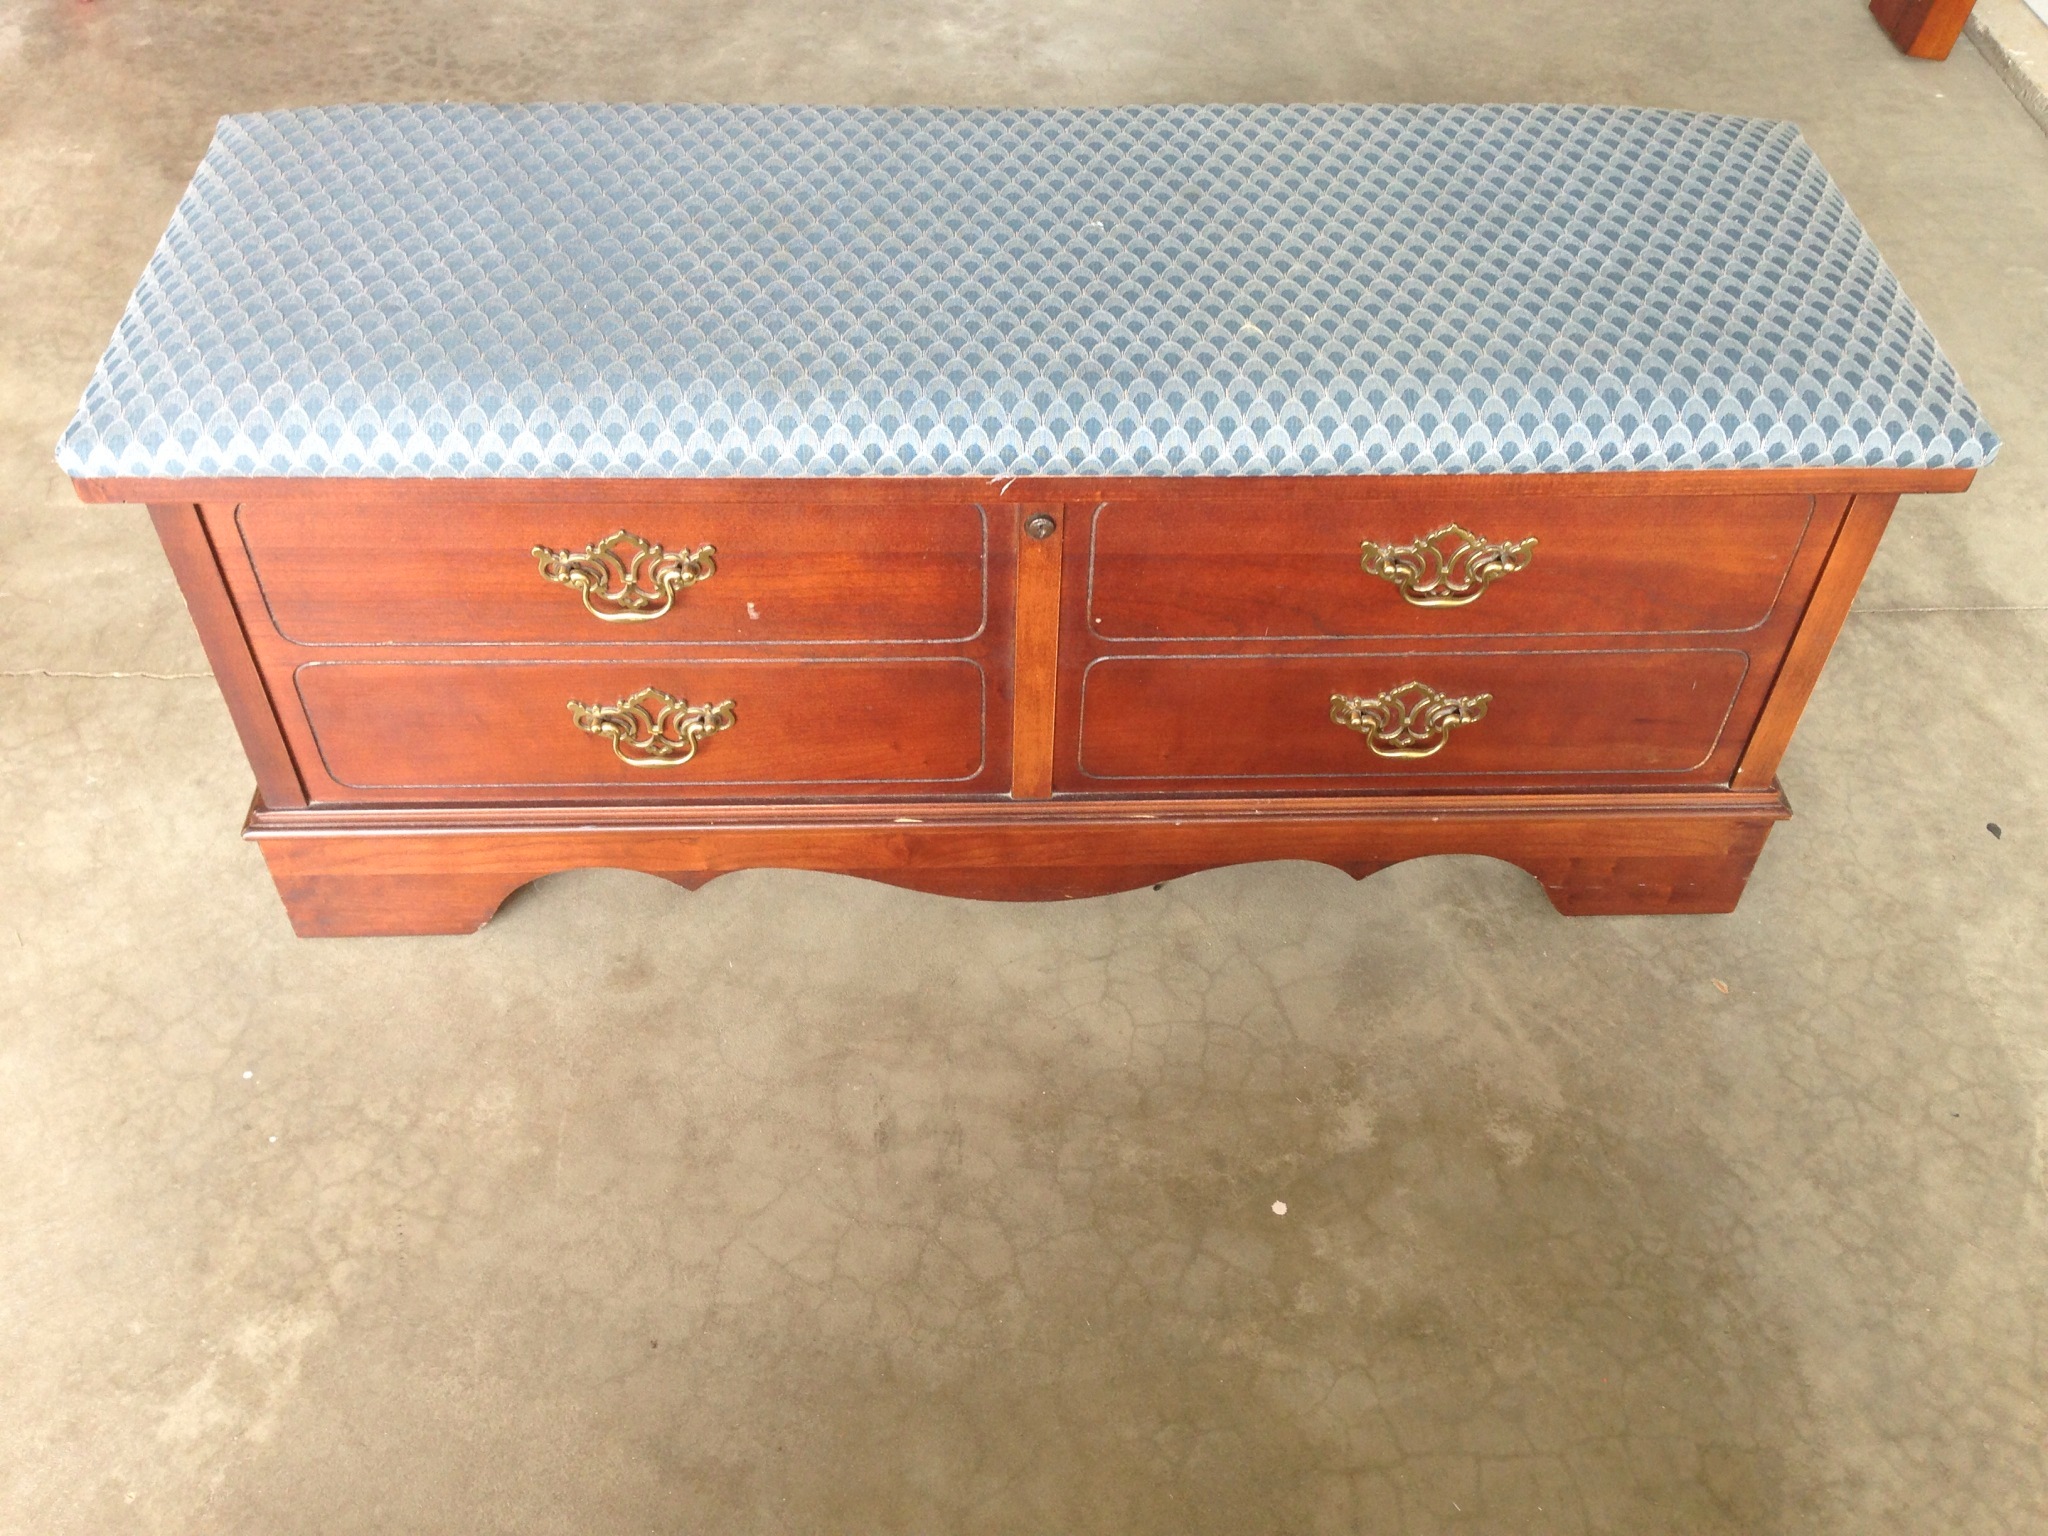
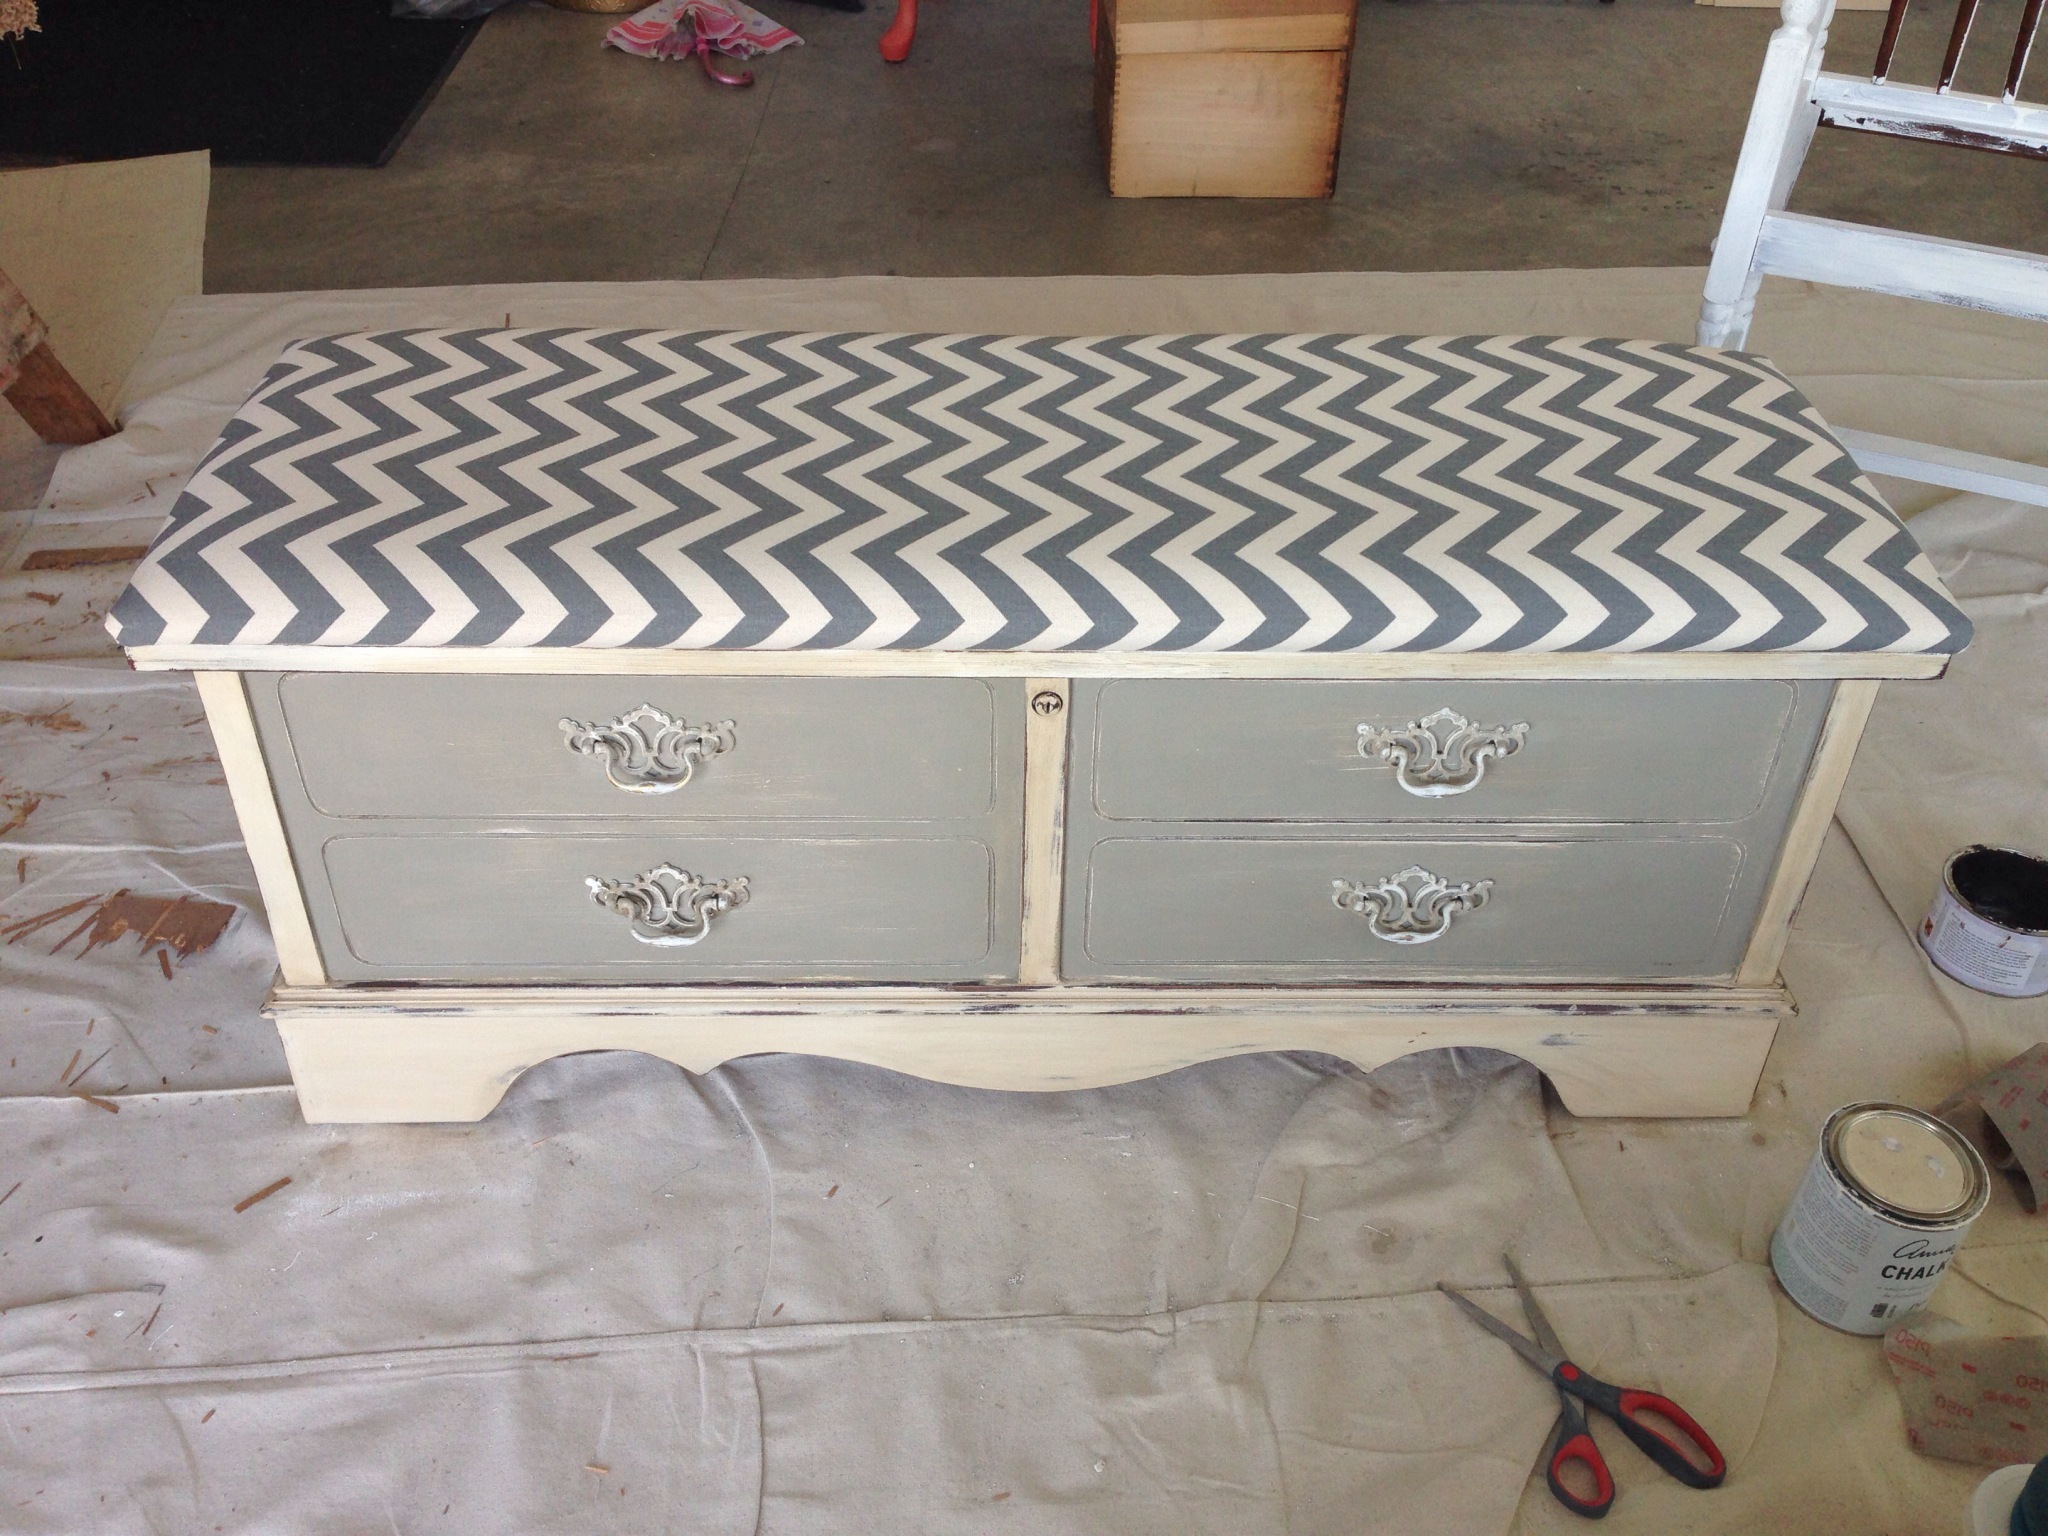
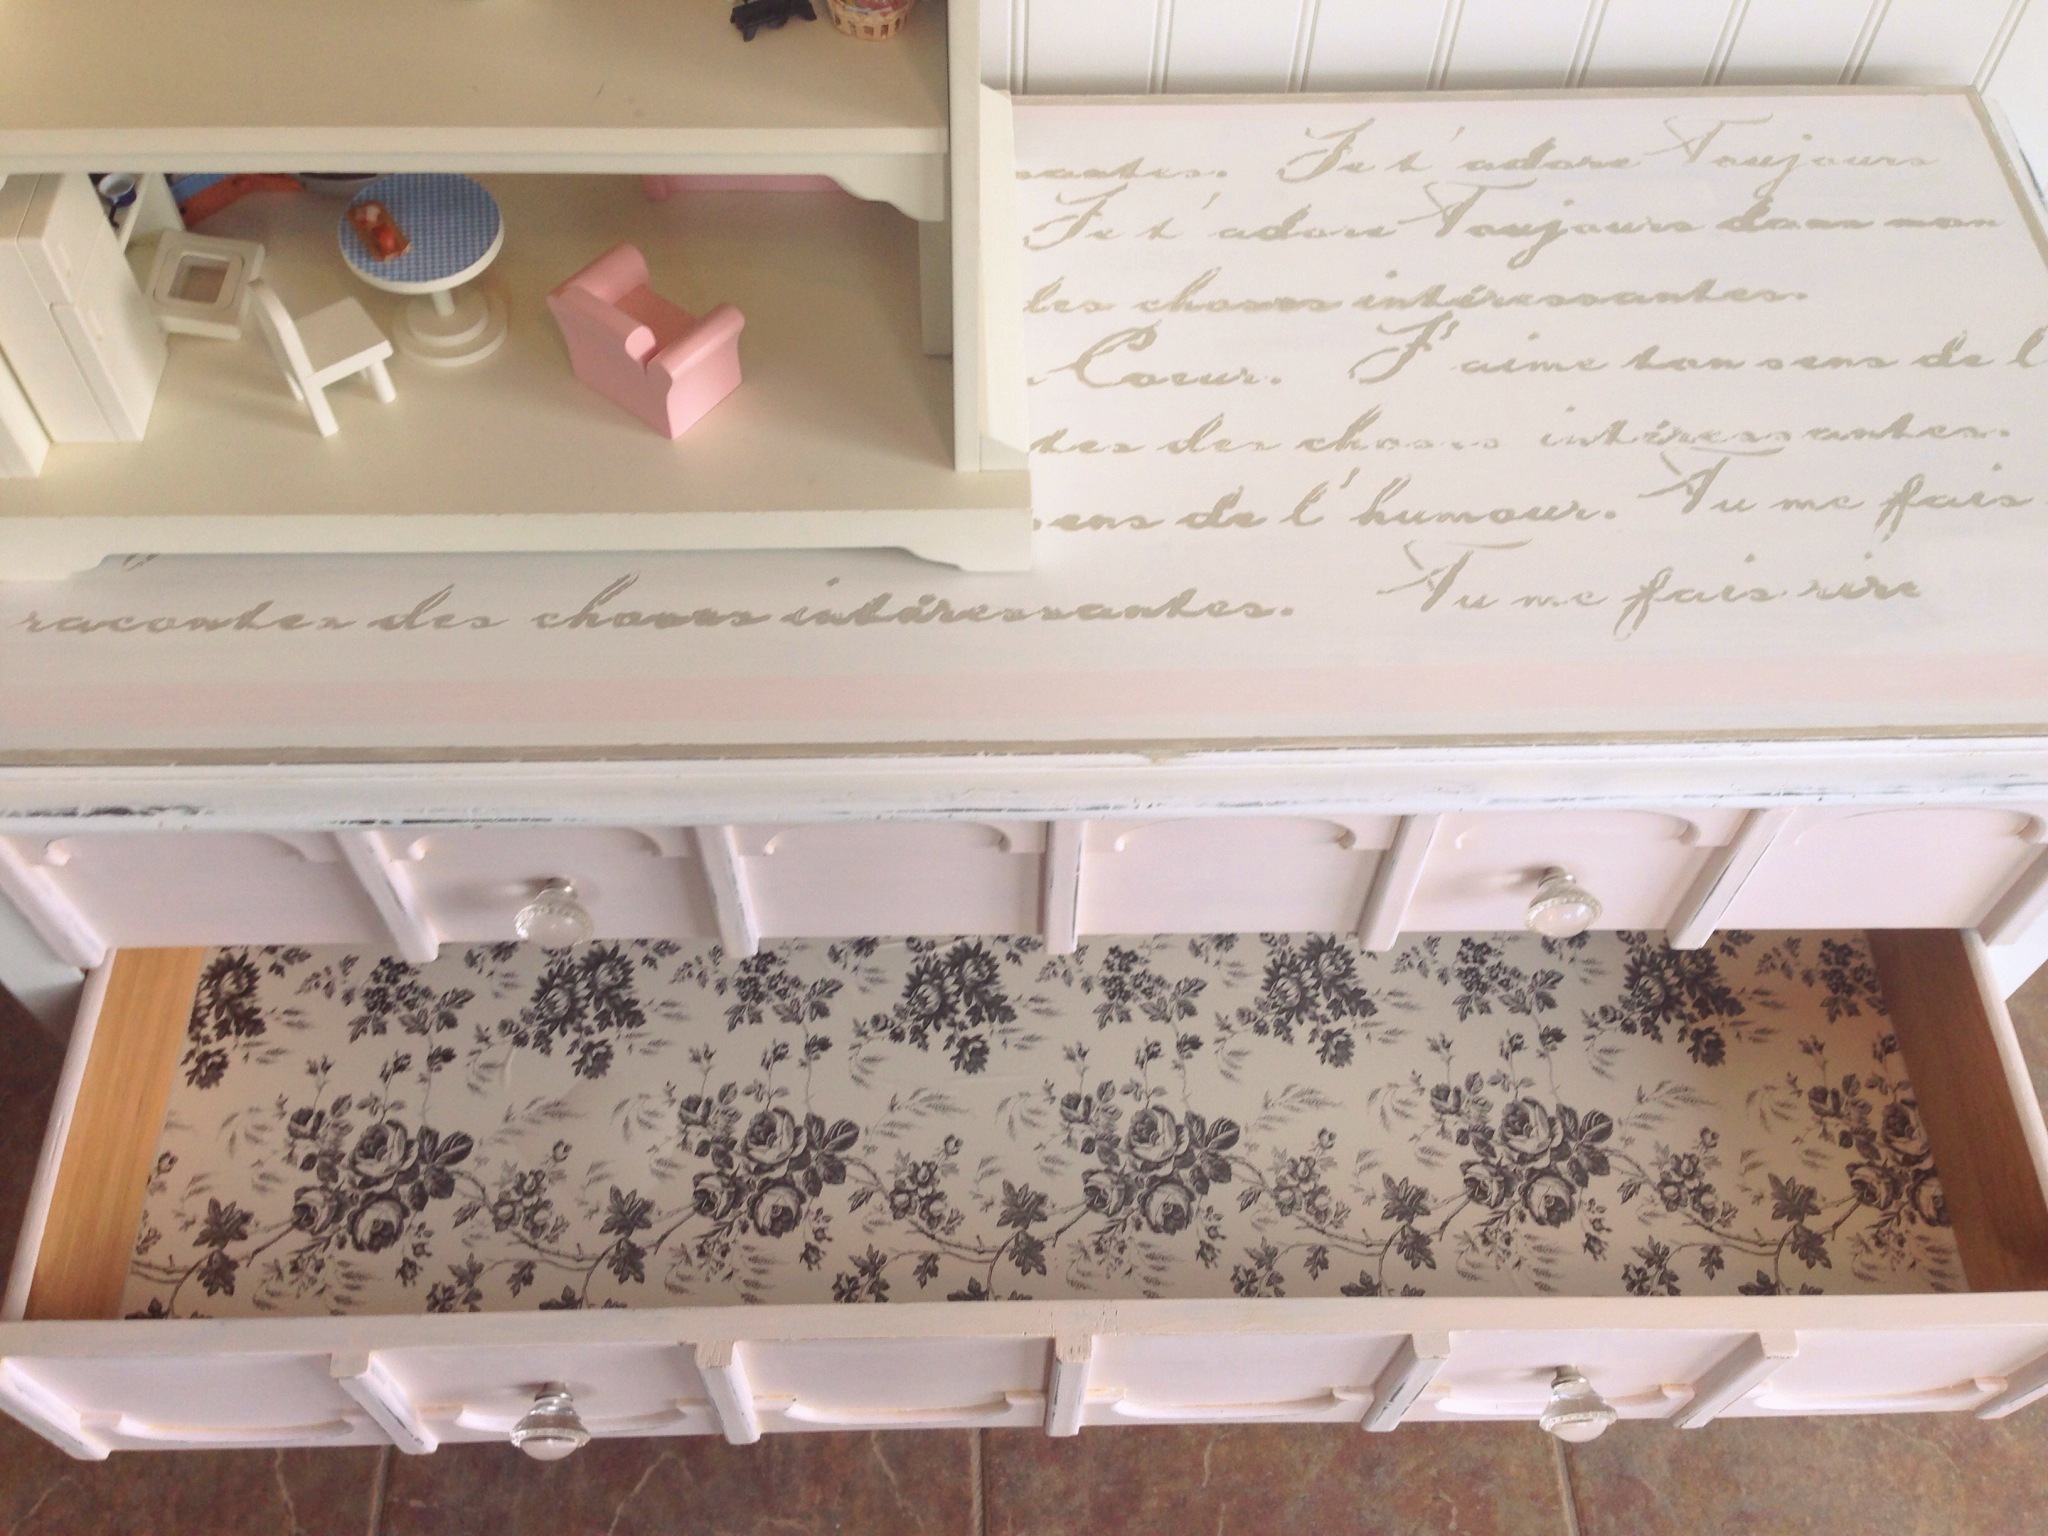
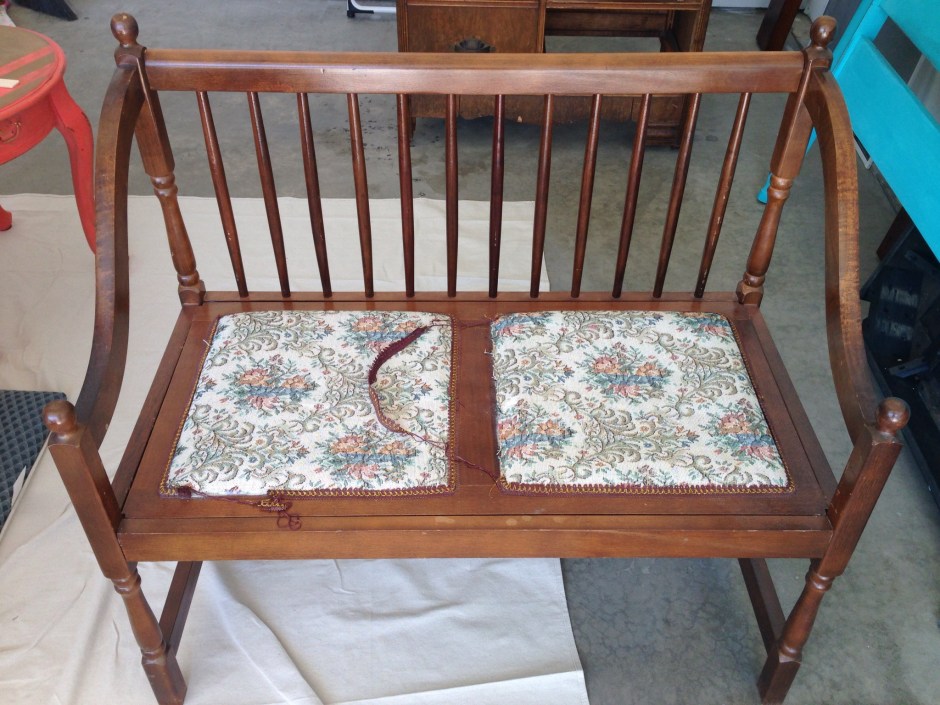
I found this awesome settee on craigslist and couldn’t wait to get my hands on it.  I have to say it wasn’t much to look at when I saw it.  I knew with some Annie Sloan chalk paint, she could beautiful once again.

settee old

I applied two coats of Annie Sloan Pure White to the entire settee.  Once dried I sanded to distress and then applied my favorite wax mixture.  I used 1 part Annie Sloan Dark Wax to 2 parts Mineral spirits.  This “waters” down the wax and allows you to brush on the entire piece rather than rubbing the wax on.  I find that it gives it a more realistic aged effect.  Afterwards you simple take a lint free cloth and wipe the wax glaze off.  This leaves the finish super smooth.  You will still need to add a protective coat of wax.

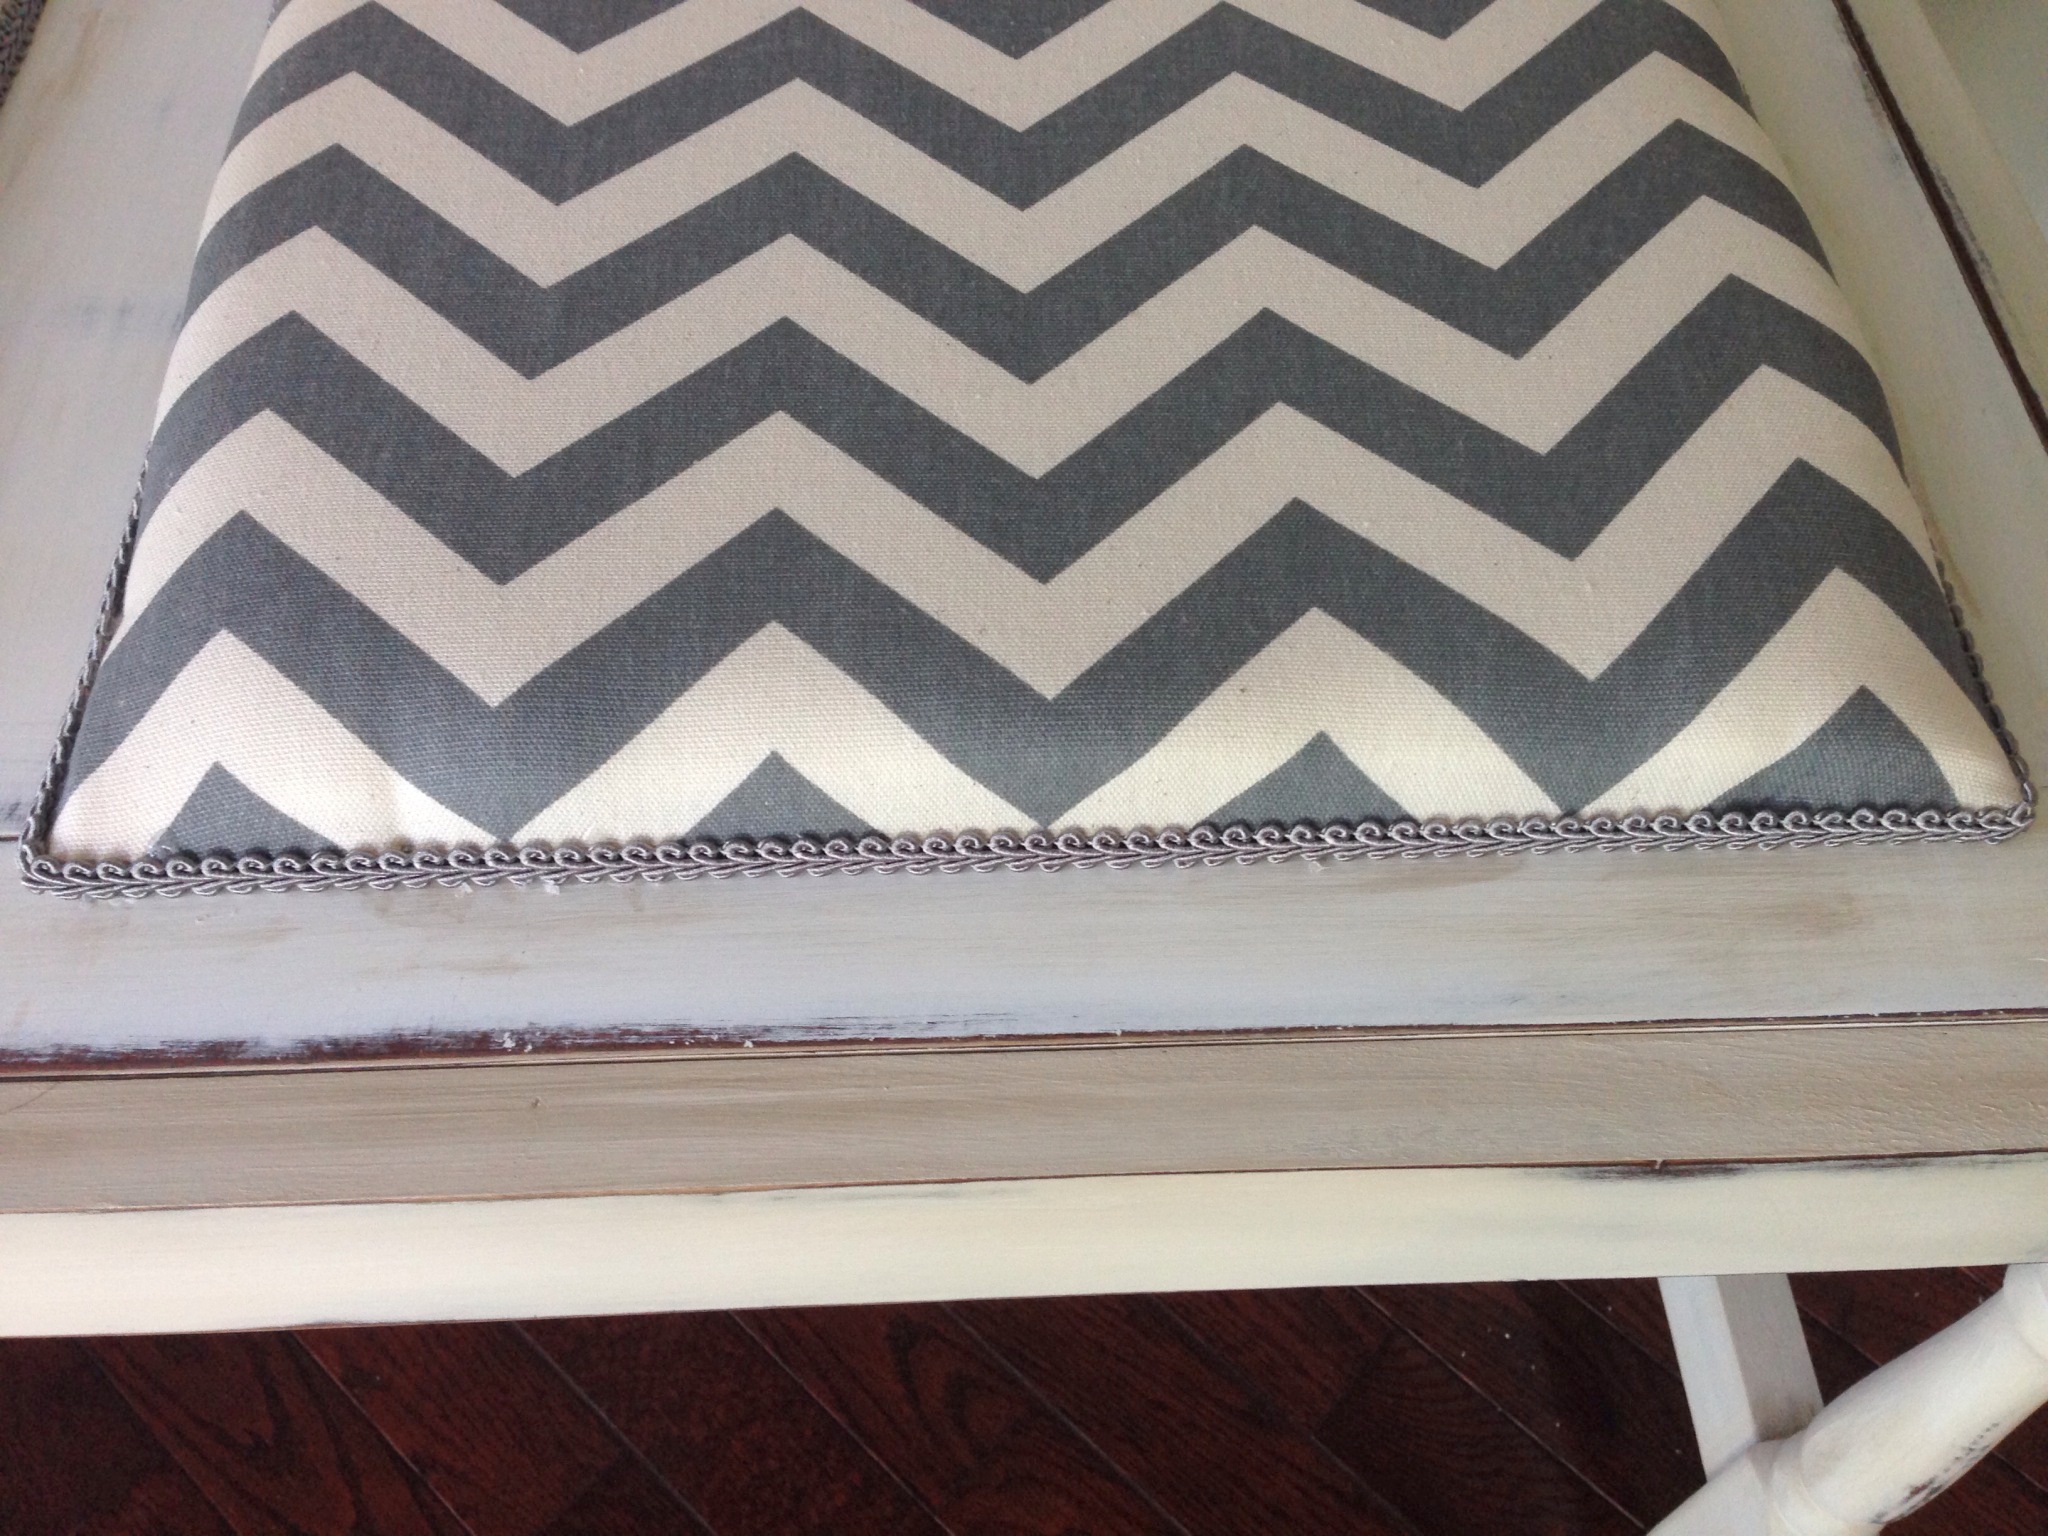
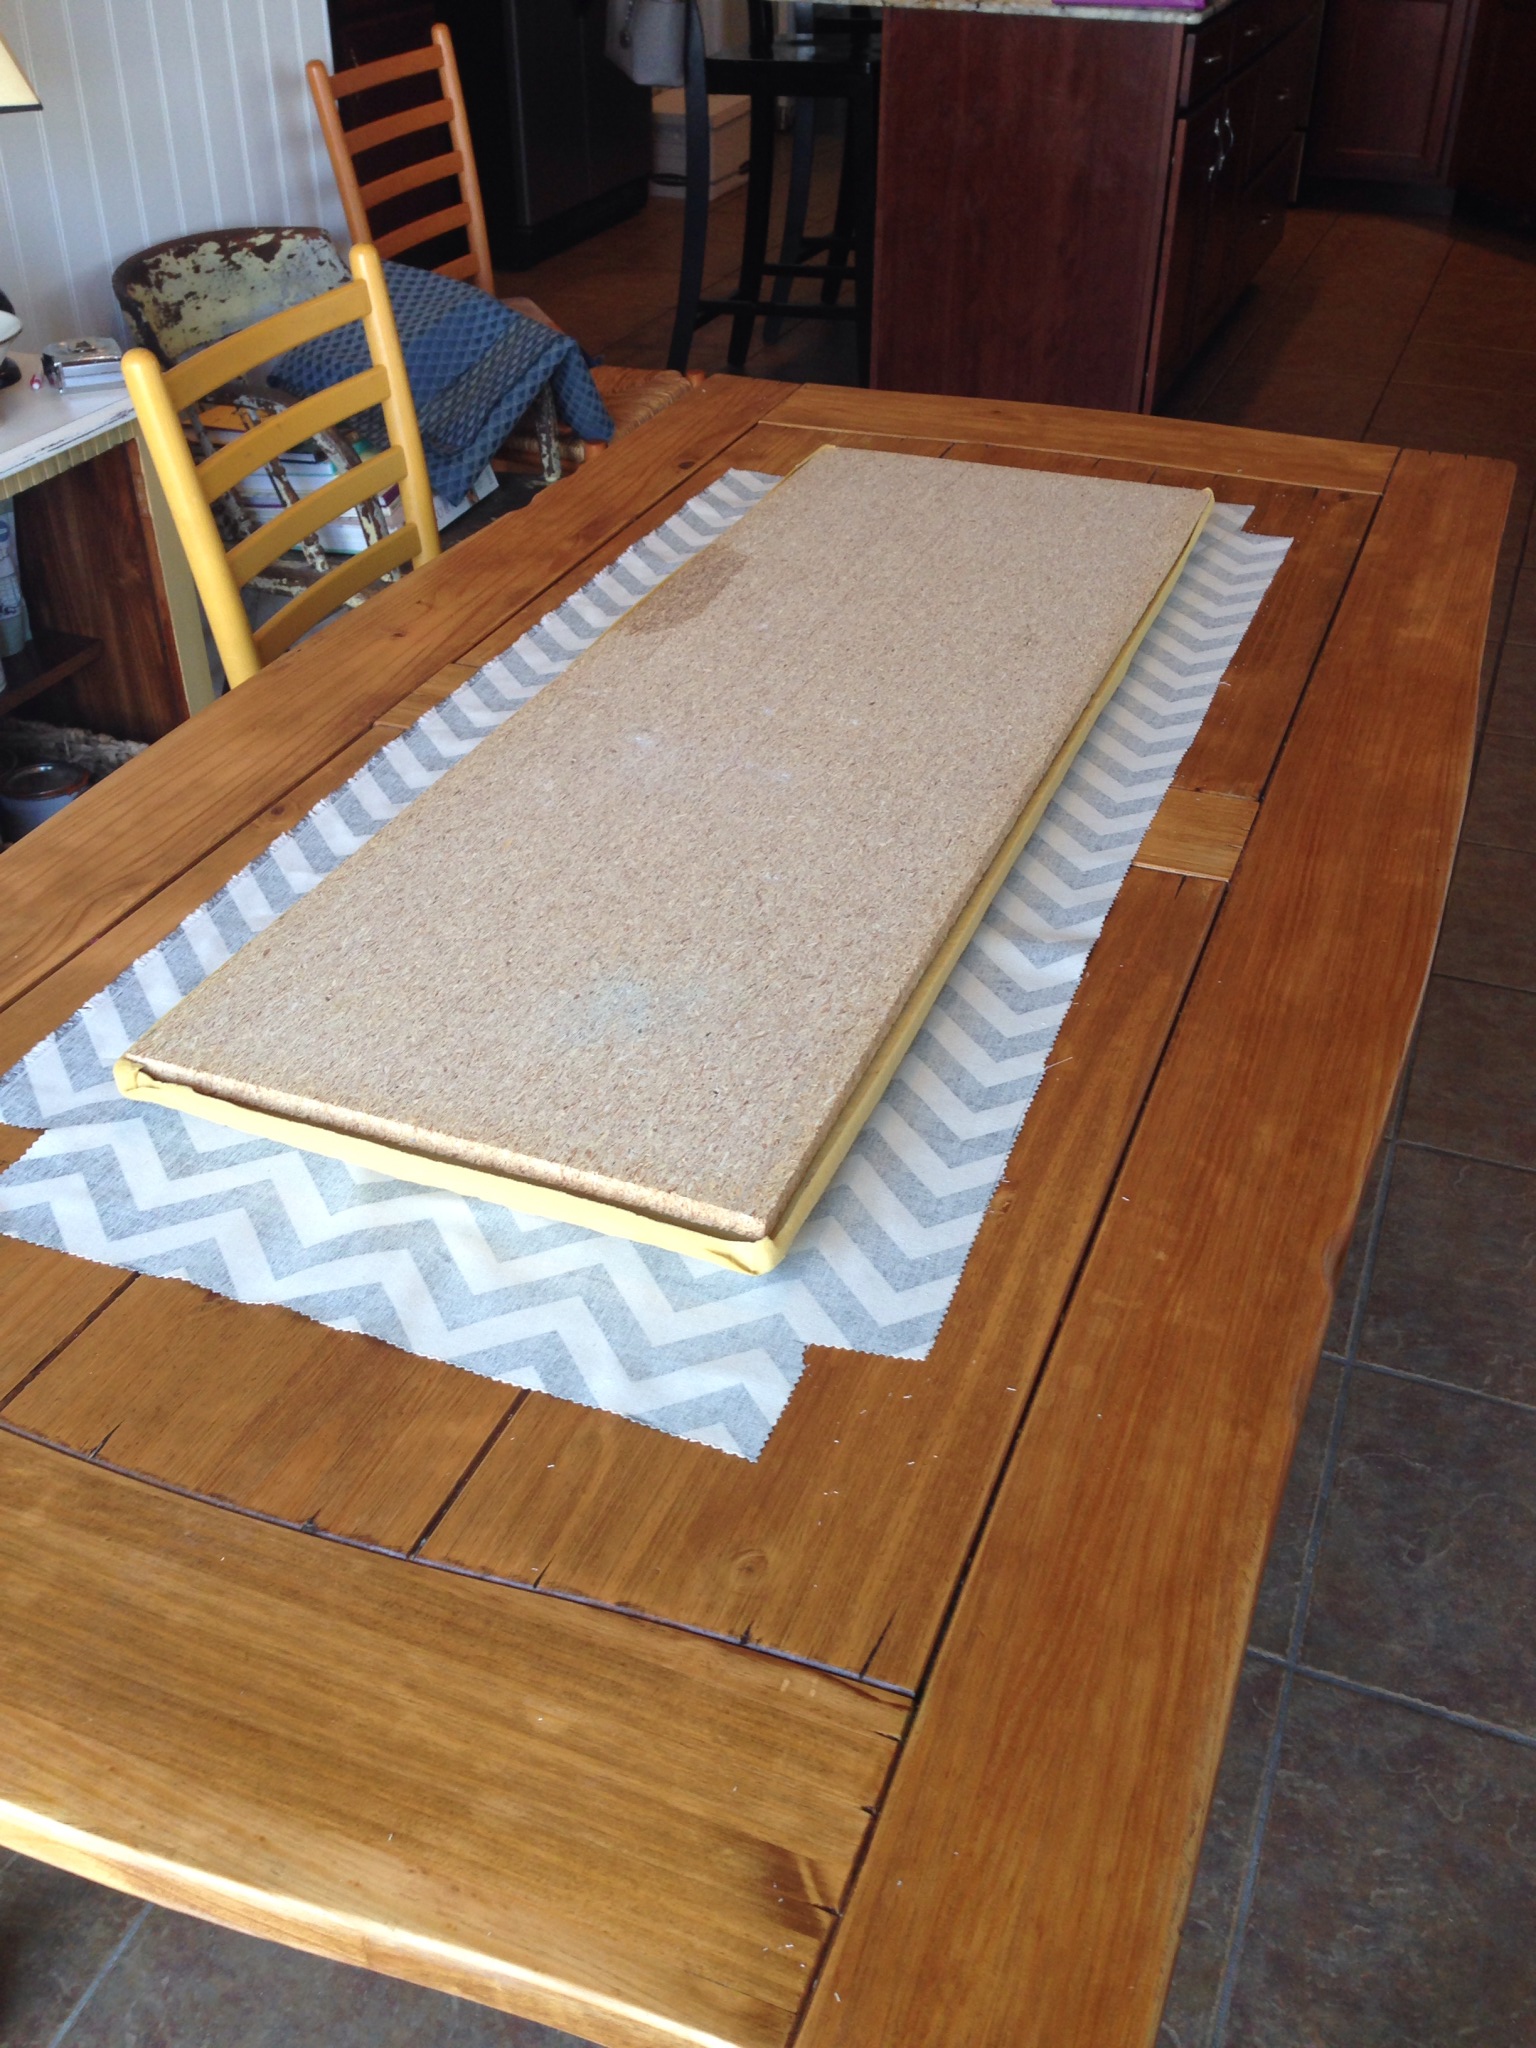
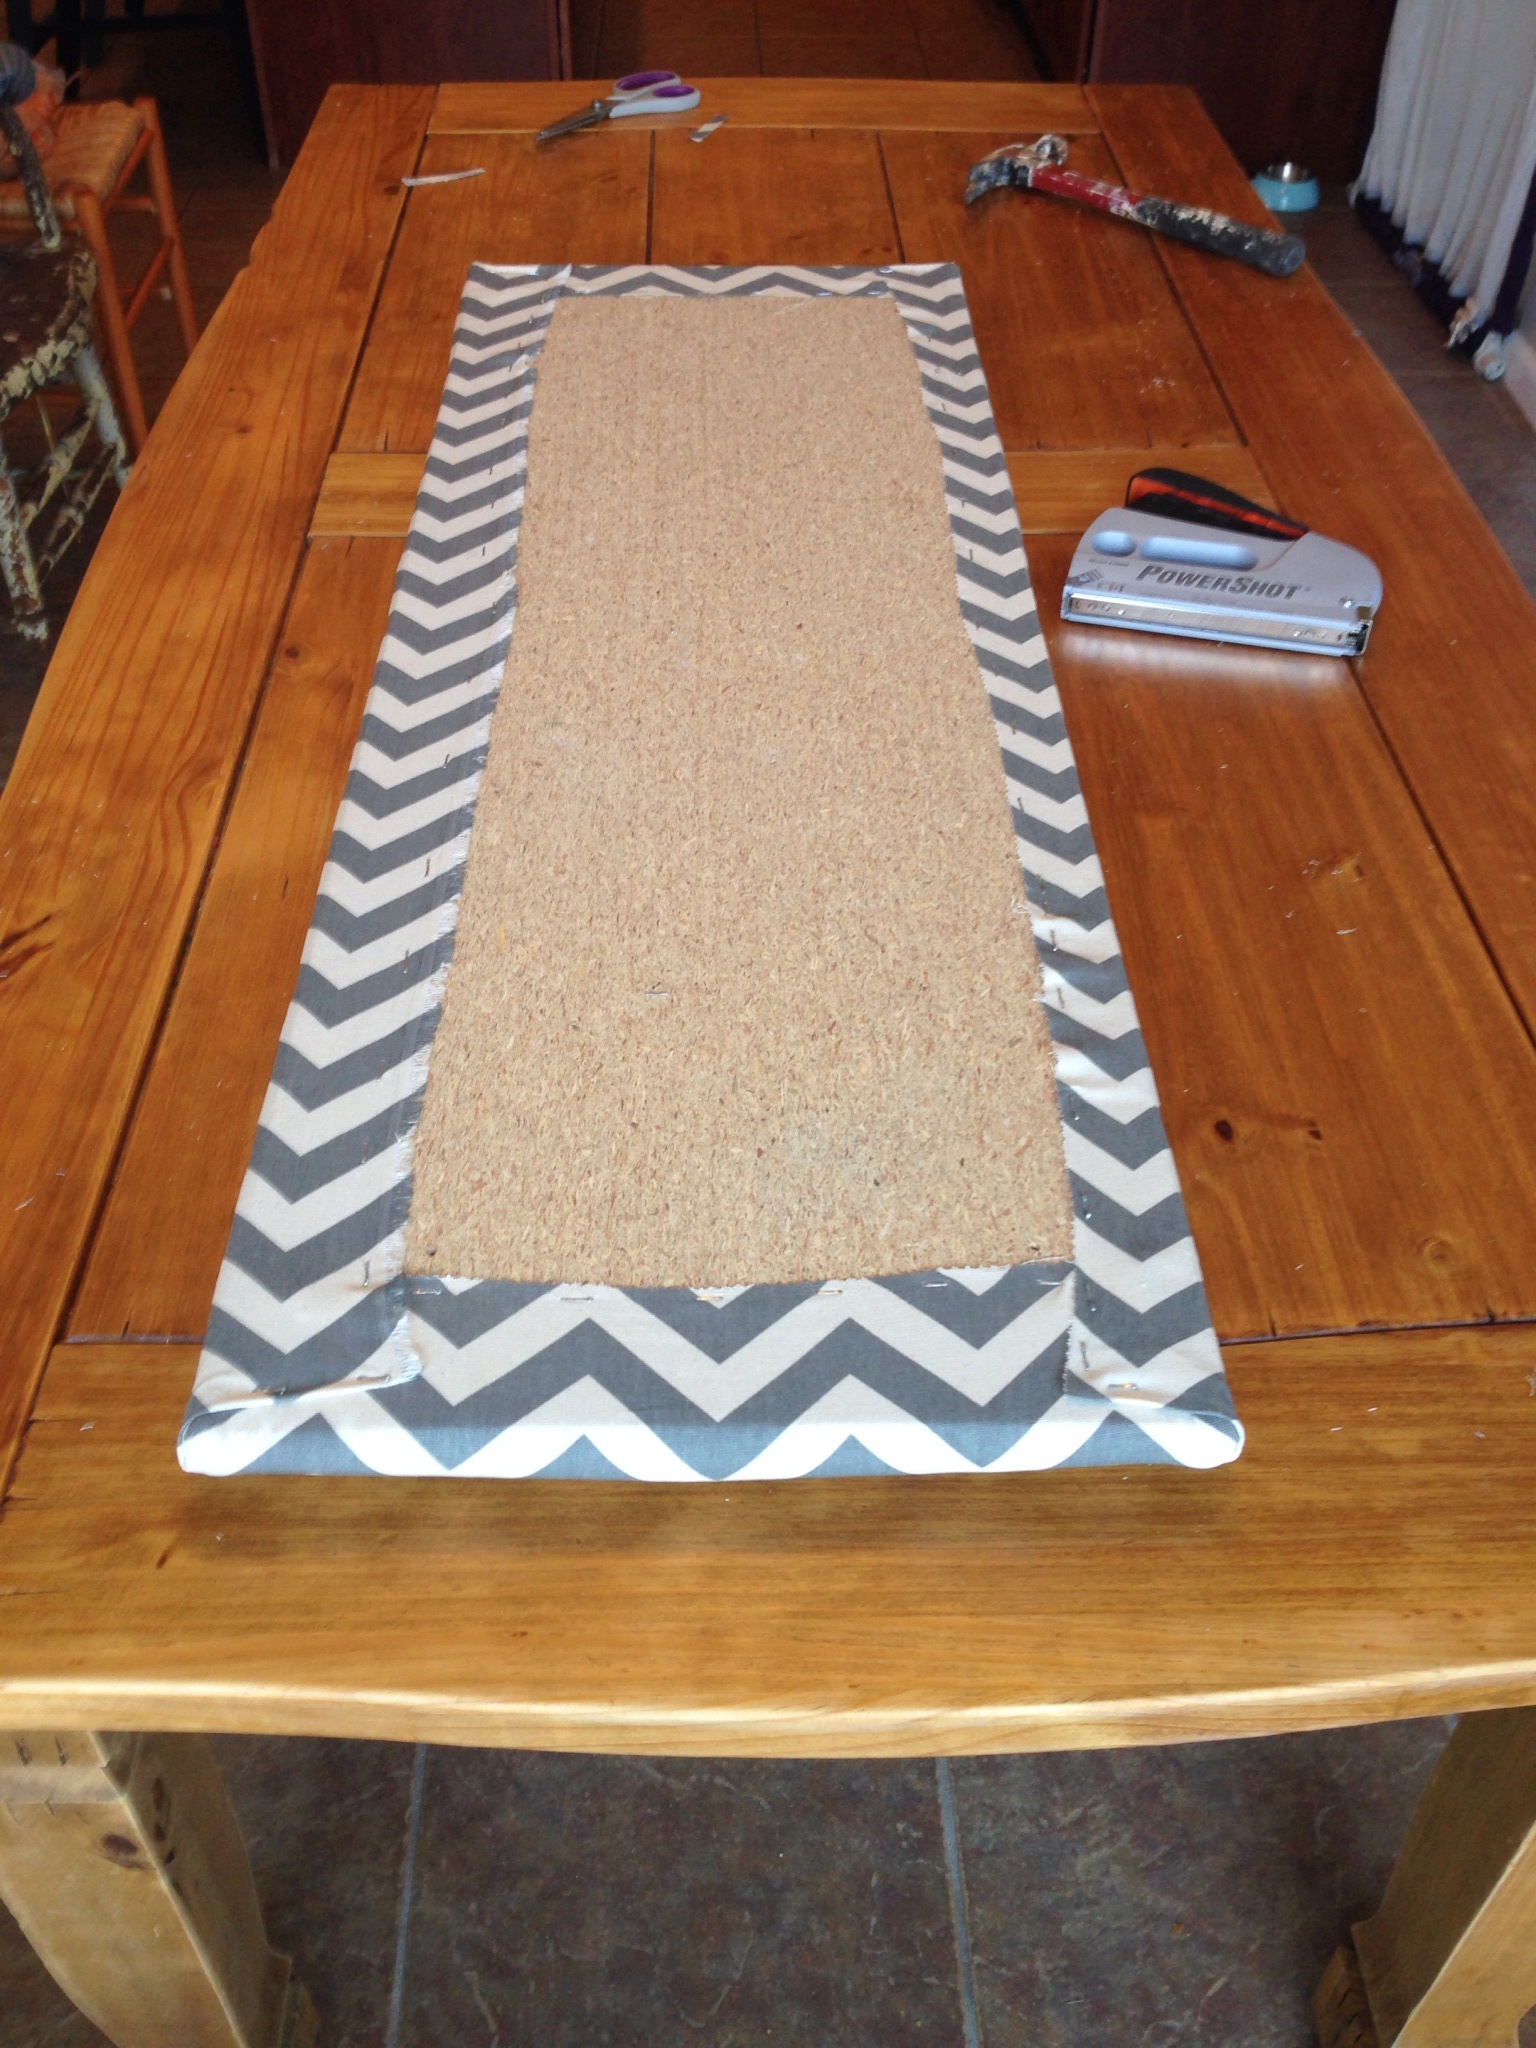
Now to reupholster this piece….All I have to say is thank God my Dad was staying with me while he is in transition of moving to Florida.  He sat and removed every single staple from the old upholstery.  THANK YOU DAD!  That was probably the hardest part of this makeover.  Once he removed the old fabric we realized that none of the foam or wood could be reused.  It was completely shot.  My dad took the plywood to Lowe’s and they custom cut two new pieces for us.  He then went to Hobby Lobby to pick up new foam.  We quickly got to work replacing the entire seat.  It is so much more comfortable and sturdy now.  I added a decorative trim around the fabric to hide the nails and give it a little more pizazz.  I just love the way it turned out.  What a difference some paint and new fabric can make.  My oldest daughter is trying to hijack this piece for her room.  I need to sell it while she is at school:-)   I think it would be great as a bench in a living room or entry way.  It would be perfect in a mud room as well.  Just adorable.  Right now it is sitting at the end of my daughters bed and it does look like it belongs there.  🙂  If it doesn’t sell I know it was meant to be right where it sits now.

Settee new settee 3 Settee 2 settee seat

New Venture Drives Us to Collect Dresses

You just never know what a day has in store for you. Today I planned to do errands and housework, maybe bake banana bread. Ho hum. Instead I’m starting a charity with Kristin, updating my resume, and getting ready for a foreign exchange student! I love good surprises!

photo (3)

I have my girls’ First Communion dresses in the back of my car. I wanted to get them out of the guest closet before Hendrik, our foreign exchange student, arrives from Germany. Because I was struggling with whether or not to save them for my girls (my mom saved ours), I called Kristin. We discussed the fact that we have 5 daughters between us, and more like 6 or 7 little white dresses after a couple of flower girl gigs, and there are so many families that can’t afford fancy dresses for First Communion.

Kristin had a brilliant idea! We could start a “First Communion Dress Collection” similar to the Prom Dress “shops” that are conducted for girls who can’t afford a dress for their prom. I live in a huge Catholic parish that has a significant underprivileged population. Wouldn’t it be fun to set up a cute little FREE “shop” for families to browse before First Communion each spring? Kristin lives in a city with a thriving Catholic population and a significantly higher socio-economic level. We will collect donated dresses, have them cleaned, store them until spring, and stage them for “resale” (at no cost to the customers)! I called my parish, and they are IN!

We are beside ourselves with excitement! What a fun way to reuse these beautiful dresses! And veils, and shoes, and gloves, and purses, and bows, and all of those sweet little accessories that make First Communion so memorable. We realize that not everyone is Catholic and makes their First Communion, but white flower girl dresses fit the bill perfectly for First Communion and can also be donated. 😉

I’m going to dig out all of our First Communion pics and post them! The picture is memory enough; we don’t want the dresses to get dusty and frail rather than be worn in another celebration of life!

Kim's 1st communion portraitkristin38grace first comm1st_Comunion 005IMG_1760ella first commgIMG_1764


Hope Chest Makeover

We all have them. . . the old hope chest we either inherited from a family relative or that were gifted to us in our teens.  A friend (Deana), I met online asked me if there was anything we could do to update an old hope chest of hers.  She referred to another I had sold about a month earlier.

chest finish

Deana really liked the chevron pattern on top and asked if I could do the same to her chest.  Unfortunately her hope chest was a little different.  It had a fabric top.  I was pretty certain that the wood underneath would be “unfinished” but thought we could just recover with a cheveron fabric.

deana top deana side Deana chest before

I got to work on this chest by cleaning it and detaching the fabric top.  It was screwed in to the top of the chest with 8 screws.

I started painting the chest keeping the other grey and white one in mind.  I used the same colors (Annie Sloan Pure White and Paris Grey) and asked Deana if she wanted it aged and distressed just like the one she liked.  She said yes so I got to work on the fun part…..beating up the furniture a bit.  🙂

Next I went upholstery shopping.  I sent Deana several samples but in the end we knew we wanted the grey and white chevron.

Once the staples were removed, I measured the fabric and used the original fabric as my template.  I was able to use the original foam as well.  It was still in great shape.  Using a heavy duty staple gun, I attached the fabric to the original board.

deana recover

deana top finish deana finish top

Finally I waxed the chest using Shabby Paints Vax and using Annie Sloan dark wax for aging.

deana finish

I have to say the best part was delivering this chest back to Deana.  I am always nervous when a person entrusts a piece of furntiture to me.  The look on Deana’s face and her reaction made my day.  Most excited about my new friendship with Deana….she is so sweet and shares my passion for all things repurposed.  We were “texting buddies” for sure during this process.  Deana kept sending other pieces around her house asking if we could make those over as well.  And let me just say, she has GREAT ideas and fabulous taste!  How gorgeous is Deana??

deana

A before and after of this chest back home!

deana before after

What do you think?  Do you have an old hope chest like this?  If so please share your makeovers.

Chicken Gyros for Dinner

Tried this recipe when my sister and her family were visiting last year, and they keep acting like I invented the sun. So here ya go!

chicken gyros

Chicken Gyros with Tzatziki Sauce

2 chicken breasts, cut into strips

1/4 cup olive oil

2 tablespoons lemon juice

2 tablespoons garlic, chopped

1 teaspoon oregano {dried}

1/2 teaspoon cumin

1/2 teaspoon onion {powder}

1 teaspoon salt

In a bowl or bag, place all of the ingredients together and mix well. Marinate for up to 2 hours.

Once ready, place the chicken on a grill {even a George Foreman} or in a pan and cook for about 3-4 minutes per side.


Tzatziki Sauce

1 cup cucumber, finely chopped

1/2 cup greek yogurt

1/4 cup sour cream

1 teaspoon mint

1 teaspoon cilantro

1 tablespoon lemon juice

1 garlic clove, minced

1/4 teaspoon salt

Mix all of the ingredients together and let sit for at least 1 hour before using.


Condiments:

pita bread

lettuce

tomatoes, sliced

red onion, thinly sliced

tzatziki sauce {recipe above}


Take a piece of pita bread and layer with the lettuce, chicken, tomato, red onion and tzatziki sauce. Mmmmmm. . .

Pretty sure I found this recipe over at Basil. . .by Ashley. Thanks, Ashley!

http://basil-albi.blogspot.com/2011/11/chicken-gyros-with-tzatziki-sauce.html#.U-UfuvldWSo


Goodwill table turned Dollhouse chest


I picked up this little table last week at Goodwill.  I just loved the legs and the design on the drawers.  I knew with some paint and new hardware, it could be so beautiful.  My daughters thought it was the ugliest table they had ever seen.  I wish I had taken a before picture but I totally forgot. 

I decided to turn it into a Dollhouse chest.  It has two huge drawers for storing toys.  I went to one of my favorite local shops to pick up some paint.  I used Van Gogh’s First Kiss (pink) and Maison Blanche’s Magnolia (While).  After applying two coats of each I started work on the French stenciling.  This part was a little tough because I had these strips of French sayings.  After I would paint one, I would have to wait for the paint to dry, move it down and paint the next verse.  The drying part is what slowed the process down.  Once the stencil was applied I taped off the edges of the top and put a grey border all the way around.  I added a pink stripe towards the bottom and one along the top.  Next came the distressing.  I only lightly distressed this piece.

After sanding and cleaning the table off I applied two coats of Shabby Paints Vax.  This is one of my favorite products.  It is so easy to apply and requires no buffing.  It is also VERY durable. 

Now my daughters all love this table and are begging to have it placed in their rooms.  So sorry girls!  You didn’t love me when I was ugly, so I must find a new home:-)

doll house 7 Doll house table 2 doll house table 3 doll house table 4 doll house table 6 Doll house table


Back to School. . .Back to PTO

My girls are in two different schools. For me that means two PTOs to support. As we gear up for Open Houses next week, I am recalling how hot it was last year as parents and kids toured the high school campus. We had a PTG table set up as they entered the Performing Arts Center, and I wished I had cold drinks to offer. So this year I am going to be prepared. I am labeling bottled water with our school’s new logo. Maybe this will even encourage folks to join PTG!

photo 4 (1)

It’s very easy to label your own water bottles. There is a template in Microsoft Word that prints 7 labels per sheet. I print mine on cardstock because I find it easier to cut and tape, but you don’t have to. I cut them with a paper cutter so that they are straight and then apply them with clear packing tape. Easy breezy! Just don’t make the mistake I did at Libby’s Sweet 16 party and place them in a tub of ice. When water got under the tape, the ink ran! Oops. Or maybe you don’t have an inkjet printer, and that won’t be an issue. Stay cool!

photo 1 (2)photo 2 (2)photo 3 (1)

IMG_0381

For more on Libby’s Sweet 16 party. . .https://thespoonandthethimble.com/2013/09/24/sweetest-16/

A Place to Store Paint

Sister Kim came to visit this weekend.  After seeing cans of paint, brushes, stencils, stain and other painting paraphernalia, she decided she had to find an accessible place for me to store paint.  She shopped around a bit in the garage and set her eyes on this ugly Goodwill find I picked up for  $12.50.

10594300_10203019592104618_772624481_o 10571513_10203019589104543_1534104580_o 10585114_10203019591424601_42406470_o

I love to paint in my garage but store my paint in the basement.  Needless to say when I paint, cans rarely make their way back down there.  Kim decided we had to keep them somewhere that I would actually put them away.  So we painted this ugly little girl up to match my kitchen décor.  God knows I spend enough time in that room.

We painted the cabinet using The Real Milk Paint Co’s Yellow Rose and Maison Blanche Magnolia.

10586886_10203020545448451_988992091_o

After painting I applied Dark wax and distressed.  My favorite sister then applied a coat of Shabby Paints Vax (We LOVE this stuff).  No buffing required.  Kim then ran through the house collecting various paint supplies strewn all about and began filling this little cabinet up.

10594310_10203020536488227_1474122292_o 10586836_10203020484926938_1852481747_o 10581276_10203020485086942_1407306628_n 10577991_10203020540928338_559743629_o 10589428_10203020447966014_414381723_o